Passed my written!

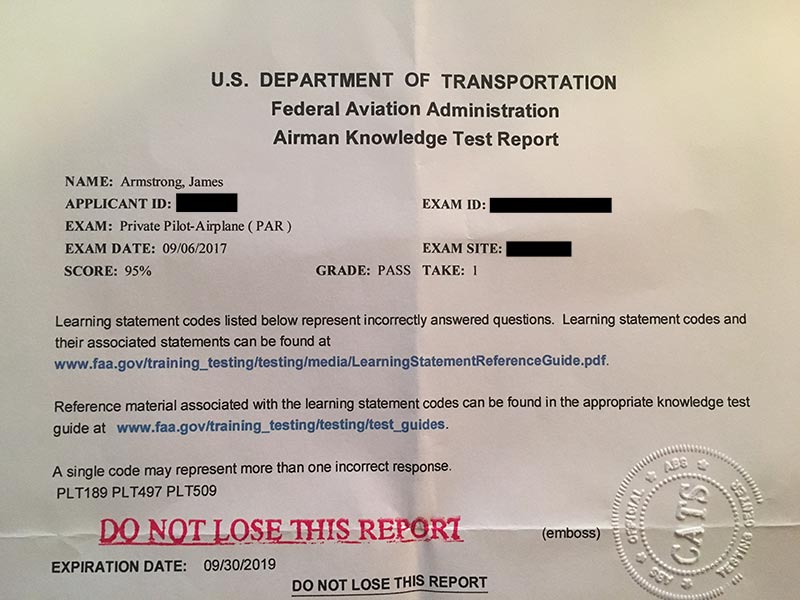
I reached another training milestone today when I took and passed my written PPL knowledge exam with a score of 95.

I’ve been studying for the exam for quite awhile, both with the textbooks that my ground school kit came with and an online video ground school from King Schools. I was on the fence about ordering the King video course, but in the end I’m glad I did. The videos are certainly a bit cheesy but they do present the information well and give you some good tips and tricks that helped out with the actual test. There are also a bunch of videos on other topics that were included — things like prepping for the oral and practical exams, dealing with emergencies, and in-depth lessons on weather and cross country planning.

I finished up the videos and started taking the practice exams. I scored over 90 on all three practice exams. I wound up with a random day off of work today and decided that I might as well try and knock this thing out! I took one last practice exam — from the Gleim exam prep book — and scored in the high 80s. I figured I’d be as ready as I ever would (not exactly true) and I started calling around to see if could schedule the exam on short notice. I found a school in Bridgeport that was able to fit me in — I grabbed a big cup of coffee, my plotter and E6B, and I was off!

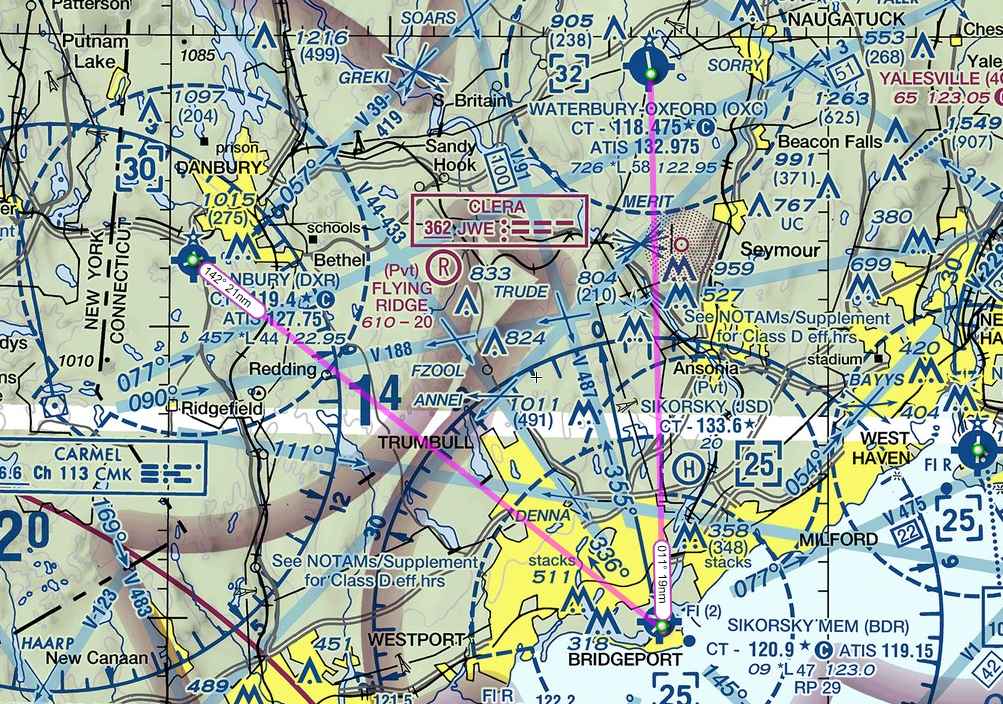
After some initial computer snafus trying to get me setup for the test (I seriously thought for a moment that the proctor was going to tell me to come back another day) I was ready to take the actual exam. I took my time and worked through all of the questions. A lot were easy, there were a few weight and balance and performance questions that required some simple math, and a few questions dealing with sectionals and reading various info from the charts. One thing that was conspicuously missing from my exam — cross country planning questions!

I was a bit miffed about this, honestly… I had practiced my butt off learning the ins and outs of my E6B and stepping through all of the questions regarding flight planning. I’m not sorry I put all of that time in — this is a real-world skill I’ll need to demonstrate on my oral and practical, but I was still upset I didn’t get to show off my new skills to the test computer.

Before I knew it, the test was over and I was ready to hit the grading button. When it told me I only got three questions wrong a wave of relief washed over me. I was done with the test! This wouldn’t be the end of my studying, but a huge weight had been lifted from my shoulders.

A few tips if you are prepping to take the exam:

  • Don’t bother bringing your own writing implements. I brought my favorite pen and a nice mechanical pencil perfect for drawing exact lines on the charts. I wasn’t allowed to bring them in — the test center provided a few pencils instead.
  • Make sure your test center will provide calculators. Mine did, but I wasn’t sure going in and I forgot to ask the question. I wound up buying a cheap $4 calculator at Walgreens before the test to make sure I wouldn’t be doing W&B calculations by hand.
  • Make your test reservations in advance. Don’t be impulsive like me and wake up and decide to take the test on a whim! It worked out in the end, but I had a brief panic after making the appointment with the flight school. I called them directly because the CATS number you have to call was putting me on perma-hold. However, the flight school told me I’d have to call CATS and schedule the test even though I made the appointment with the school. I called back a few times and finally got someone on the line and was able to set everything up, but my blood pressure was through the roof by the time I got through to them.
  • Take your time preparing. Right before I went into the exam I was browsing through the Gleim book and found a few questions I wasn’t sharp on — things like the different types of hypoxia. The best idea would’ve been to spend a week or so brushing up on weak areas after going through the practice exams. My high scores on the practice tests led me to believe I was ready (plus, I am a “good test taker”). I didn’t want to wait and just wanted to get this over with. It worked out in my case, but I’ll admit it wasn’t the smartest approach to the exam. I should’ve spent some time going over every question in the Gleim book to make sure I wouldn’t be surprised by anything.

Oh well, I didn’t do everything perfectly but it all worked out in the end. As for the questions I got wrong — one was code PLT189 (regarding carb heat and the effect on mixture and engine performance), one was code PLT497 (transponder usage, I picked an answer that had a non-existent mode letter), and the last was code PLT509 (I messed up a question on wake turbulence vortices). All things I should’ve gotten right (and probably would’ve if I had reviewed a bit more before taking the exam). You can look up all of the question codes in this FAA document.

I’m a little glad I didn’t get 100% (no one likes a know-it-all) and I’m a lot glad I didn’t get a 70%. Hopefully my score will make my oral exam a little less grueling!

Grounded…and a very important preflight lesson

I showed up at the airport today ready to fly — the ceiling was around 4,000ft, winds were a calm 3-4kts, and visibility was unlimited. Seemed like I might even be able to get some more solo time in (assuming I didn’t scare the crap out of my instructor during the first few laps around the pattern).

I went out to preflight and everything looked good. My instructor came out and I was just climbing into the plane when he yelled over from the passenger side: “Hey, did you preflight this airplane?”

Uh oh…that could only mean I had missed something, and miss something I had! My instructor showed me the passenger side main gear tire, and there was a flat spot (which I had noticed) and a bit of the tire cord peeking through (which I had not).

I didn’t think to take a picture, but here’s an example of what we saw (but our tire was nowhere near as bad as this one — it had just the tiniest bit of cord visible):

Bald tire
Not going anywhere with a tire that looks like this!

So, that was it, plane is grounded, done for the day.

I am kicking myself for not noticing this on preflight. My instructor emphasized just how important this is — a tire in bad condition can lead to a blowout on landing and turn a fun day into a tragedy.

You can bet I’ll be paying more attention to the small details during my preflights from now on. I feel like I’ve gotten a bit complacent in that regard, and that is dangerous.

I’ll file this one under Ground School — I’m glad I learned this lesson on the ground and not after touching down on the runway!


No tach, no flight!

Today was the day I was supposed to take my pre-solo checkride with another instructor from my flight school. I was a bit anxious driving out to the airport — it had been a week since I practiced my maneuvers with my regular CFI and I was really hoping I wouldn’t make a fool out of myself!

I met my instructor for the day and we started off going over my logbook and talking about some of the procedures I’ve been training on. I was able to answer most of his questions correctly, but I did get hit with a couple of things I should’ve known but didn’t (like cloud clearance requirements for VFR flight — I keep mixing up the above clouds and below clouds numbers!)

After being sufficiently grilled, we were off to the plane. I did my preflight and we climbed in. I started my pre-start checklist and the differences between the two CFIs became apparent — this CFI wanted me to call out all of the checklist items as I performed them. He mentioned most examiners would expect this during a certificate checkride. I have to say, I love my instructor, but I do like flying with different people because you really do get some different perspectives on things.

I got through the checklist and cranked the starter. The engine started right up and I checked the tach. Nothing! It was pegged on zero. I mentioned this to my instructor and he thought it over for a second. He tapped on the gauge, I ran the engine up to see if it was stuck or something, but nothing worked. He said he would be fine flying without it, but I probably would have a hard time taking the checkride with no tach. We decided to shut down and call a mechanic.

C172 tachometer

Inside, we had no luck. The mechanic informed us he had just replaced the tach yesterday and it was probably a broken cable. He would have to order a part; there would be no checkride today.

We headed into a classroom and went over cross country planning for a bit. I showed him the flight plan I had sketched out and he gave me some really good tips on choosing checkpoints and planning out the details of the flight.

I was disappointed I couldn’t knock the checkride out today, but not much I can do about that!

Flight time today: 0.0 hours (!)
Total flight time to date: 30.7 hours
Total takeoffs to date: 102
Total landings to date: 98

Cross country planning

I had a premonition that we wouldn’t be flying today when I encountered IMC while driving to the airport. There was a low layer of fog which made the drive in pretty interesting. Sure enough, when I got to DXR, my instructor said we’d be doing some ground school today and going over cross country planning.

I was pretty excited about this, since, as my instructor says, this is why you fly…to get somewhere! He told me my mission was to fly from DXR to Groton, CT (GON), about 65nm away. Then we would head to Windham (IJD), an untowered airport about 25nm north of Groton. Finally, we would head home to DXR, 63nm to the west.

We sketched out the flight plan on my sectional and looked at considerations like airspace we’d be passing through, safe altitudes across the trip, and any obstacles we might have to content with. My CFI showed me how to use my E6B flight computer to calculate the proper headings, and then he showed me how to use the E6B to factor wind forecasts into the equation and come up with a wind correction angle (WCA) for each leg.

E6B flight computer
E6B flight computer

I was told we would not have any more ground school until I came up with a full flight plan for the cross country. I’ll be posting about this process in more detail as I work through it. Even though I haven’t soloed yet, this made me feel like I was really on my way to a major milestone in my training!

Ground School – Presolo written test review and my first endorsement!

I thought the weather was going to be OK for flying today and was mentally prepared for another trip to POU. When I got to the airport, however, reports were coming in of some pretty strong gusting winds so my instructor announced that we would not be going up today.

I actually wasn’t too upset about this — I wasn’t feeling 100% and for some reason felt like I was going to have a lousy flight. After my last flight boosted my confidence, I was a bit nervous about a bad performance eroding my progress. So, when my CFI told me we were Earthbound today, I took it as a sign from above and was happy we’d be able to review my pre-solo written test.

Pre-solo written exam

We spent two hours going over my two exams — one was the pre-solo written exam proper, the other was a rental checkout form that asks questions specific to the C172M I fly. The pre-solo written exam is pretty important — my CFI described it as a legal document that the school keeps on file. If I were to get into an accident or break a serious rule while soloing, the first thing the FAA would ask to see would be my pre-solo written exam. I took a lot of time researching my answers and noting where in the FAR, AIM, or POH I found each answer.

I did pretty well on the test — I had one question I got wrong about the accuracy of fuel gauges… I had done some research on this and felt the FARs could be interpreted to mean fuel gauges did need to be accurate at all times, but my instructor had implied that they couldn’t be trusted and I thought he was one of the “accurate only when empty” believers (there is an ongoing debate about how the wording of the FAR should be interpreted — some people believe that, legally speaking, fuel gauges only need to be accurate when indicating empty tanks).

This was completely my mistake, I should have answered with what I thought was true and then defended it if my instructor had a problem with it… instead I answered the question how I thought he wanted it answered. Turns out I had misjudged him and I was actually really happy to hear he had the same interpretation of the FARs as I had arrived at.

The rest of the questions were OK. We delved into a few and discussed the topics at length — things like weight and balance, airspace, emergency procedures, etc… I felt it was a really good review and I ended the lesson feeling like I knew more than I did when I showed up that morning.

My instructor graded both tests a pass and I received my first logbook endorsement (pre-solo knowledge exam)! One step closer to flying the plane myself.

First trip to another airport! DXR to POU

Today was the day! My first landings at another field. My CFI informed me we would be heading to Dutchess County (POU) today. We headed to the classroom to brief for the flight.

We broke out the sectional and examined our route of flight. I was told we would be departing DXR to the west and intercepting the Carmel VOR’s 340° radial. This would take us more or less direct to POU. On the way back we would tune the Kingston VOR and fly the 150° radial back to Danbury. We also discussed pilotage options — basically, following some prominent interstate highways that led from Danbury to Poughkeepsie. I was excited — I had been planning for this flight for a few days now and felt like I was ready.

The mood was lighthearted as I taxied out to runway 26. It was a frigid day so we were expecting good climb performance out of ol’ N1727V. I lined up on the runway and performed the takeoff, holding runway heading until 1,500 feet.

I turned on a heading of 300° and continued climbing to our planned altitude of 3,000 feet. Once we were out of Danbury’s airspace we tuned Dutchess tower and settled into cruise. I was happy to have some time flying (mostly) straight and (mostly) level — all of this rapid fire action in the pattern recently had left me yearning for some cruise flight. I worked on keeping the plane in trim and pointed somewhat on course.

As the CDI needle crept towards center I started turning to intercept the radial. We flew the 340° radial until we were getting close to the airport — it’s only about 25nm from DXR so it didn’t take too long! I called POU tower around 10 miles out and they told me to join a left downwind for runway 24.

KPOU

We started our descent to pattern altitude of 1,200 feet and my instructor pointed out some ground references to keep me on track. We entered the downwind, slowed the plane down, and turned to base where we were given clearance to land. I turned on final and was presented with a PAPI (precision approach path indicator) — a visual indicator of proper glide slope that sits to the side of the runway. I tried to adjust my descent to keep the PAPI lights in the proper configuration. There are four lights on a PAPI — two white and two red mean you are on a perfect glide slope. If you get three or four white lights it means you are above the slope, three or four red mean you are below. We came in for a rather sloppy landing as I still have some issues keeping the plane centered on final.

PAPI lights
An example of a PAPI — the two white and two red lights to the left of the runway

After landing we turned off the runway and cleaned up the plane. We taxied back to runway 24 and I requested permission from tower to takeoff. I had a momentary bout of confusion on the radio — I am so used to flying out of Danbury the different taxiways and runway numbers threw me for a bit of a loop. Soon we were taking off of 24 and flying the POU pattern.

We did another landing, this time a touch and go. I can’t say this landing was any better than the first. Another lap in the pattern — another touch and go and we were back in the air. My instructor told tower we’d be coming in for one more landing and then heading back to Danbury.

One last sloppy landing later and we were heading home, tracking direct to the Kingston VOR. I got my first view of a VOR station from the air. We overflew the VOR as my instructor pointed out the cone of confusion, that area where the CDI needle can’t be trusted as you come directly over the station. I used line of sight to estimate where the 150° radial would take us and held the plane on that track. As we came out of the cone of confusion, I was pleased to see the needle center, confirming I was on the right course.

We called Danbury tower and were given a right traffic pattern for runway 26 as I brought us back to our home turf. I got a bit disoriented approaching the airport as my normal points of reference were all mixed up. Eventually I had us back on the ground with another crappy landing and we taxied back to the ramp.

My landings still need a lot of work, but I felt pretty good about navigating to a different airport and logging my first non-DXR landings. I left the airport today feeling a real sense of accomplishment — even though it was a very short trip, I had successfully navigated to another airport and back! Another five takeoffs and landings for the logbook.

Flight time today: 1.2 hours
Total flight time to date: 18.4 hours
Total takeoffs to date: 40
Total landings to date: 36

Redbird Redux

I was anxious to get back in the air after my last lesson didn’t meet my standards, but Mother Nature was not cooperating and the fleet was grounded today. We worked on some more electronic navigation, revisiting VOR and NDB procedures in the classroom before taking a spin in the Redbird simulator. Some of this lesson was a repeat of what I learned last time, but it was a good review and there was enough new stuff added in to keep my interest (including the different types of VORs, the test tone that is broadcast to indicate a VOR is under maintenance, and how to send/receive voice broadcasts over a VOR frequency).

Redbird FMX simulator
My ride for the day

After the classroom work, I took to the sim and departed DXR, using VORs to navigate to Bridgeport’s Sikorsky Memorial (BDR). Then, I headed north to Waterbury-Oxford (OXC).

DXR-BDR-OXC

Not too much else to add… I’m feeling pretty good about my VOR skills — all my flight simming time at home has definitely made this part of training easier. The forecast for tomorrow is showing a chance of improvement, so fingers are crossed for some air time tomorrow!

Simulator time today: 0.5 hours
Total simulator time to date: 2.1 hours

My first landings

Today was a milestone I’ve been waiting for since I started my training — I recorded my first landings in my logbook!

Plane after landing in street
Luckily, my landings were on the runway!

We started the lesson with some classroom time going over the pattern and each phase of the landing. The landing pattern has several distinct parts — after taking off, you turn to the crosswind leg, where you turn 90° from the runway heading (either left or right, depending on the airport or what ATC tells you to do). Then you turn 90° again into the downwind leg — this leg has you flying parallel to the runway with a tailwind, approximately one mile laterally from the runway. Once you pass the end of the runway and it is behind you at an approximate 45° angle to your wing, you turn 90° to the base leg. Then, you turn the final 90° which puts you on final approach to the runway into the wind.

Standard traffic pattern
Standard (left hand) traffic pattern

There is a lot to do when preparing to land and it got a bit overwhelming. We started with my CFI showing me the full process from takeoff to landing. Then it was my turn! My instructor handled the radio calls so I could focus on flying the plane. At DXR, we have a noise abatement procedure which requires turns to be made at 1,200 MSL, so after taking off we climbed to 1,200 feet and turned left to crosswind. My instructor gave me some local landmarks to use to judge when to turn — this is fine while I’m learning but eventually I will need to be able to do this even if I am at an airport I’ve never been to before. It is important to understand what the various distances look like so you don’t need to rely on a landmark that is specific to a certain location.

Turning crosswind, we continued our climb to DXR’s pattern altitude of 1,700 feet MSL. At this point, I reduced power and brought the nose down to hold the altitude and then turned downwind. While on the downwind leg, I lowered the flaps to 10° and my instructor called the tower to report we were on the downwind. Our speed for the downwind leg is 90mph (the Cessna 172M I am flying has its airspeed indicator in mph instead of knots), which is controlled with the elevators (pitch) and not the throttle (power). We received landing clearance to runway 26 and when we were abeam the runway numbers I reduced power once again to start descending.

I then turned onto base and dropped the flaps to 20°. I slowed the plane to the base leg speed of 80mph and turned to final.

On final approach, the flaps were lowered to 30° and the speed was lowered to 70mph. At this point, you switch to controlling the speed of the plane with the throttle and use the pitch to keep the nose held steady on your landing target. My plane has 40° of flaps and my CFI intends to teach me how to use them, so we lowered full flaps while descending to the runway. While on final approach, you use the ailerons to keep the plane tracking the centerline of the runway while using rudder to move the nose left or right to keep it centered.

As you get just about the runway, you perform the roundout where you level the plane and allow it to start to settle into the landing. At this point, my CFI says the goal is to prevent the plane from landing — you look at a point down the runway (instead of fixating on the runway right in front of you) and gradually apply back pressure to the yoke to keep it from landing — this pitches the nose up so you land on the main gears instead of the (very weak) nose gear. This final part of the landing is called the flare.

Now, from this description it may sound like I had everything under control and came in for a great landing — the real story was quite different! My instructor had to continually coach me through the process and help me with the roundout and flare to teach me when to apply the back pressure and how much pressure to apply.  We did full stop landings today, which means you actually exit the runway and clean the plane up before taxiing back to the runway to takeoff again (opposed to a touch and go, where as soon as you land you clean the plane up and apply full power to go right into another takeoff without stopping).

Another new item I learned today was how to do a short field takeoff. This technique is used when you are departing from (wait for it) a short runway and need to get to speed and off the ground as quickly as possible. Instead of pulling out onto the runway like we normally do, I taxied right up against the very edge of the threshold to maximize how much runway I’d have to work with (we were doing these on DXR’s runway 26, which is over 4,000 feet long, but sometimes you just have to pretend!) In a short field takeoff you hold the brakes while applying full throttle, and once the engine is at full power you release the brakes and off you go!

I wound up doing a total of four trips around the pattern, with four takeoffs and landings being recorded in the logbook. The winds were pretty calm and I felt like I was starting to get the hang of flying the pattern. I still wasn’t completely confident on my final approaches, but I’ve been told landings take a lot of practice. I’m confident that in time I will be performing all of the steps smoothly and confidently (at least some of the time!)

I left the airport feeling like I had taken a big step towards actually being a pilot — it was a great feeling of progress and I can’t wait to get some more practice in!

Flight time today: 1.2 hours
Total flight time to date: 11.3 hours
Total takeoffs to date: 8
Total landings to date: 4

Ground School – VOR, DME, ADF – oh my!

The weather for this weekend is forecast to be pretty lousy, so I’ve resigned myself to the fact that we won’t be flying today or tomorrow.

Luckily, my flight school is one of the only places around that has a Redbird FMX full-motion flight simulator. This is essentially a mock cockpit with all the switches and equipment you’d find on the real plane with Flight Simulator X providing the visuals.

Redbird FMX simulator cockpit
This isn’t the actual simulator at my school, but it looks exactly the same

During PPL training, you can log up to 2.5 hours of simulator time with a CFI towards your requirements. The simulator isn’t very useful for learning flight mechanics (even with full motion, it feels nothing like actually flying), but it is an amazing tool for practicing things like electronic navigation. That was the topic of today’s lesson.

We started in the classroom and reviewed three types of navigation aids. The first was VOR (VHF Omnidirectional Range) transmitters. Navigating using a VOR can be a bit tricky in practice, but the concept is fairly simple. Basically, a VOR transmits radials in all directions. The radials can be thought of as radiating (aha!) outwards from the VOR like the spokes on a wheel. The radials are identified by their outbound heading from the VOR station.

A VOR station and radials

Your VOR receiver in the plane can be tuned to a particular radial and can tell which direction your plane would need to turn to be on that radial. You can use this information to determine what heading you need to fly to go direct to the VOR. You can also use this to stay centered on a particular radial being emitted from the VOR. For example, if you plot a course on your sectional and find your destination is on the 276° radial from the XYZ VOR, you could tune XYZ’s frequency, tune your receiver to 276°, and use the receiver to keep you on that track.

That’s a very simplified explanation — in real life there is a bit more complexity and some gotchas to keep in mind, but that’s the quick and dirty version.

The second type of navigation aid is DME, which stands for Distance Measuring Equipment. If your plane has a DME receiver, you can tune it to a VOR’s frequency, but instead of providing directional info like the VOR receiver, it provides distance information so you can tell how far you are from the station. This can be very helpful in determining your location — a VOR receiver will tell you which radial you are on, but not where you are on that radial. With DME, you can pinpoint exactly where on that radial you are. DME is pretty straightforward — the only catch is that the distance provided is slant range, which means a direct line drawn from your plane to the station. That means if you are directly over the station at 6,100 feet AGL, the DME would indicate a distance of 1nm. Compare that to GPS which would show the actual horizontal distance of 0nm.

DME slant range
Illustration of how slant range is calculated

The last navigation aid we talked about was the NDB or Non-Directional Beacon. This acts sort of like a dumb VOR — it just broadcasts its location, shouting, “I’m over here!” If your plane is equipped with an Automatic Direction Finder (or ADF), that instrument will point its needle to the direction of the NDB.

After our lesson, I got a bit of flight time in the sim and practiced tracking to and from VORs and NDBs. This was actually something I had a bit of experience in from the recreational flight simming I’ve been doing at home for years. In fact, one of the best guides I’ve found explaining the ins and outs of electronic navigation is the wonderful (and simply named) Flight Simulator Navigation site. I highly recommend it!

While the sim time was productive, I was still disappointed that I had to stay on the ground today. Tomorrow will likely be the same story, but I have my fingers crossed.

Simulator time today: 0.7 hours
Total simulator time to date: 0.7 hours

Simulating the traffic pattern and go-arounds

Today I got one step closer to being able (and allowed!) to land the plane.

We started off in the classroom reviewing the traffic pattern. Basically, the traffic pattern is a standard set of rules planes are supposed to follow when arriving at and departing an airport. This way everyone knows where everyone else is supposed to be and there is less chance of a collision in the busy airport environment.

Standard traffic pattern
Standard (left hand) traffic pattern

Well, my instructor wasn’t going to set me loose in the actual pattern just yet. Instead, we headed out to the practice area and flew a simulated pattern. He gave me some reference points to base the pattern around and we went through the whole process as if we were in the real pattern — slowing the plane down for landing, lowering the flaps at the appropriate points, etc… Then, when we were on “final approach” he had me initiate a go-around procedure.

The go-around is a very important tool in the pilot’s arsenal. Anytime a landing doesn’t feel right — if the approach is not stable, or if anything seems off — you should immediately initiate a go-around and start over. A lot of pilots have killed or injured themselves by trying to force a landing when they should’ve gone around and set up again. You also need to be able to do a go-around if ATC instructs you to — maybe there has been a runway incursion by another plane or they need to close a runway for some reason — you never know!

I performed the go-arounds by applying full power and starting a climb, gradually cleaning up the flaps as we gained altitude and speed. Then we just transitioned right back into flying the pattern again and setting up for another landing.

My instructor also threw me a curveball when he “failed” my airspeed indicator for a little while — covering it with a rubber disc so I couldn’t see it. I was expected to get the airplane to the correct speeds by feel — listening to the engine, looking at the pitch of the place, how quickly we were moving across the ground, etc… I nailed this a couple of times, and others I was as much as 10mph off. It was a good learning experience. It sounds impossible but my CFI compared it to driving — you can drive without looking at your speedometer and be pretty close to your intended speed. You know what 30mph looks and feels like, you know what 60mph looks and feels like… eventually I will have that same level of intuition and comfort flying this plane.

When we were done practicing I started flying us back to DXR — I was hopeful that I might be allowed to do my first landing, but alas! It was not to be. A couple of planes were all converging at the airport at the same time as us and my CFI deemed it a bit too busy.

I’m still not confident in my ability to fly the real pattern, but my instructor assured me I will get a LOT of practice in this area!

Flight time today: 1.0 hours
Total flight time to date: 10.1 hours
Total takeoffs to date: 4