Ground School – VOR, DME, ADF – oh my!

The weather for this weekend is forecast to be pretty lousy, so I’ve resigned myself to the fact that we won’t be flying today or tomorrow.

Luckily, my flight school is one of the only places around that has a Redbird FMX full-motion flight simulator. This is essentially a mock cockpit with all the switches and equipment you’d find on the real plane with Flight Simulator X providing the visuals.

Redbird FMX simulator cockpit
This isn’t the actual simulator at my school, but it looks exactly the same

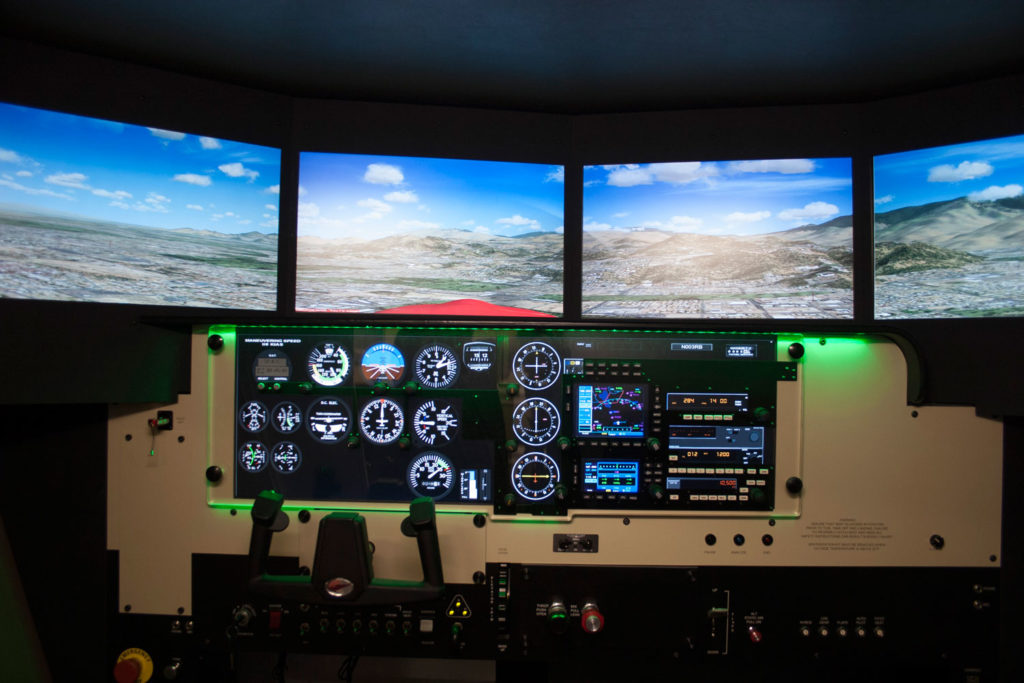
During PPL training, you can log up to 2.5 hours of simulator time with a CFI towards your requirements. The simulator isn’t very useful for learning flight mechanics (even with full motion, it feels nothing like actually flying), but it is an amazing tool for practicing things like electronic navigation. That was the topic of today’s lesson.

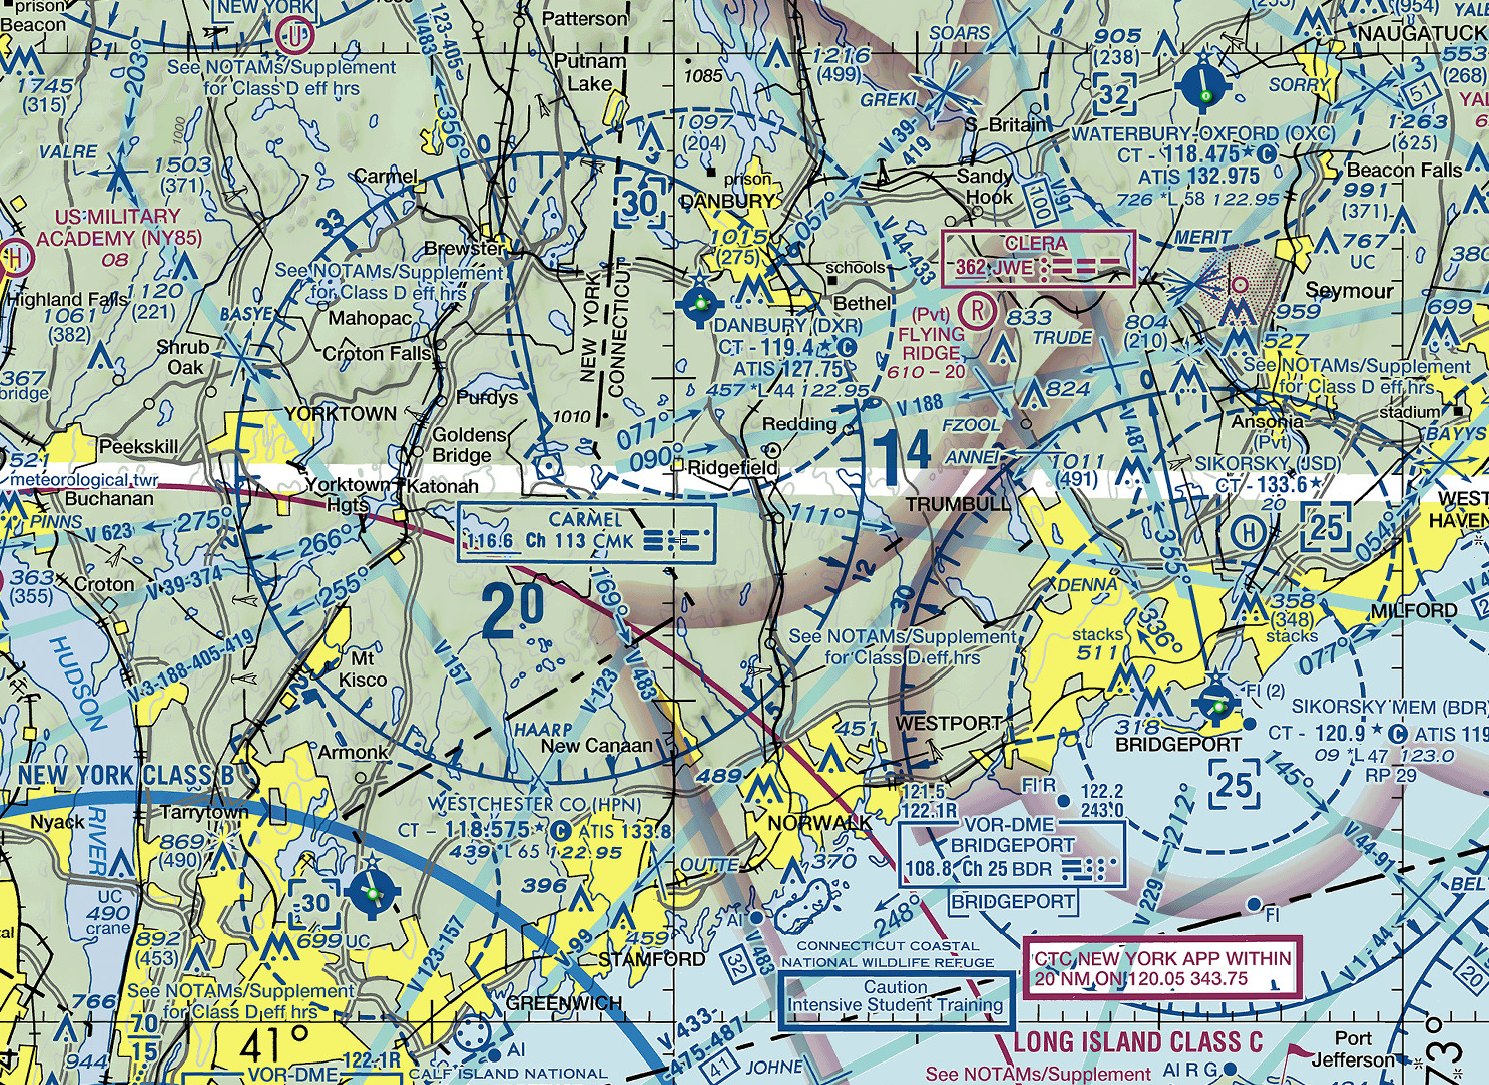
We started in the classroom and reviewed three types of navigation aids. The first was VOR (VHF Omnidirectional Range) transmitters. Navigating using a VOR can be a bit tricky in practice, but the concept is fairly simple. Basically, a VOR transmits radials in all directions. The radials can be thought of as radiating (aha!) outwards from the VOR like the spokes on a wheel. The radials are identified by their outbound heading from the VOR station.

A VOR station and radials

Your VOR receiver in the plane can be tuned to a particular radial and can tell which direction your plane would need to turn to be on that radial. You can use this information to determine what heading you need to fly to go direct to the VOR. You can also use this to stay centered on a particular radial being emitted from the VOR. For example, if you plot a course on your sectional and find your destination is on the 276° radial from the XYZ VOR, you could tune XYZ’s frequency, tune your receiver to 276°, and use the receiver to keep you on that track.

That’s a very simplified explanation — in real life there is a bit more complexity and some gotchas to keep in mind, but that’s the quick and dirty version.

The second type of navigation aid is DME, which stands for Distance Measuring Equipment. If your plane has a DME receiver, you can tune it to a VOR’s frequency, but instead of providing directional info like the VOR receiver, it provides distance information so you can tell how far you are from the station. This can be very helpful in determining your location — a VOR receiver will tell you which radial you are on, but not where you are on that radial. With DME, you can pinpoint exactly where on that radial you are. DME is pretty straightforward — the only catch is that the distance provided is slant range, which means a direct line drawn from your plane to the station. That means if you are directly over the station at 6,100 feet AGL, the DME would indicate a distance of 1nm. Compare that to GPS which would show the actual horizontal distance of 0nm.

DME slant range
Illustration of how slant range is calculated

The last navigation aid we talked about was the NDB or Non-Directional Beacon. This acts sort of like a dumb VOR — it just broadcasts its location, shouting, “I’m over here!” If your plane is equipped with an Automatic Direction Finder (or ADF), that instrument will point its needle to the direction of the NDB.

After our lesson, I got a bit of flight time in the sim and practiced tracking to and from VORs and NDBs. This was actually something I had a bit of experience in from the recreational flight simming I’ve been doing at home for years. In fact, one of the best guides I’ve found explaining the ins and outs of electronic navigation is the wonderful (and simply named) Flight Simulator Navigation site. I highly recommend it!

While the sim time was productive, I was still disappointed that I had to stay on the ground today. Tomorrow will likely be the same story, but I have my fingers crossed.

Simulator time today: 0.7 hours
Total simulator time to date: 0.7 hours

Simulating the traffic pattern and go-arounds

Today I got one step closer to being able (and allowed!) to land the plane.

We started off in the classroom reviewing the traffic pattern. Basically, the traffic pattern is a standard set of rules planes are supposed to follow when arriving at and departing an airport. This way everyone knows where everyone else is supposed to be and there is less chance of a collision in the busy airport environment.

Standard traffic pattern
Standard (left hand) traffic pattern

Well, my instructor wasn’t going to set me loose in the actual pattern just yet. Instead, we headed out to the practice area and flew a simulated pattern. He gave me some reference points to base the pattern around and we went through the whole process as if we were in the real pattern — slowing the plane down for landing, lowering the flaps at the appropriate points, etc… Then, when we were on “final approach” he had me initiate a go-around procedure.

The go-around is a very important tool in the pilot’s arsenal. Anytime a landing doesn’t feel right — if the approach is not stable, or if anything seems off — you should immediately initiate a go-around and start over. A lot of pilots have killed or injured themselves by trying to force a landing when they should’ve gone around and set up again. You also need to be able to do a go-around if ATC instructs you to — maybe there has been a runway incursion by another plane or they need to close a runway for some reason — you never know!

I performed the go-arounds by applying full power and starting a climb, gradually cleaning up the flaps as we gained altitude and speed. Then we just transitioned right back into flying the pattern again and setting up for another landing.

My instructor also threw me a curveball when he “failed” my airspeed indicator for a little while — covering it with a rubber disc so I couldn’t see it. I was expected to get the airplane to the correct speeds by feel — listening to the engine, looking at the pitch of the place, how quickly we were moving across the ground, etc… I nailed this a couple of times, and others I was as much as 10mph off. It was a good learning experience. It sounds impossible but my CFI compared it to driving — you can drive without looking at your speedometer and be pretty close to your intended speed. You know what 30mph looks and feels like, you know what 60mph looks and feels like… eventually I will have that same level of intuition and comfort flying this plane.

When we were done practicing I started flying us back to DXR — I was hopeful that I might be allowed to do my first landing, but alas! It was not to be. A couple of planes were all converging at the airport at the same time as us and my CFI deemed it a bit too busy.

I’m still not confident in my ability to fly the real pattern, but my instructor assured me I will get a LOT of practice in this area!

Flight time today: 1.0 hours
Total flight time to date: 10.1 hours
Total takeoffs to date: 4

New Year’s Eve and some ground reference maneuvers

Well, we are on the cusp of another year being over, and what better way to spend the morning of New Year’s Eve than going for a flight lesson?

Today we started with some classroom time to go over ground reference maneuvers. Up until now, all of my flight training has been focused on how to actually fly the airplane — turning, climbing, descending, etc… While doing these lessons in the practice area, I’ve been able to sort of meander around without really worrying about where I was (with my CFI making sure we stayed where he wanted us to be). Today I had to start learning to fly a prescribed path…as my instructor put it, this is the first time I’ve been told where to fly the airplane instead of how to fly the airplane.

We went over two types of ground reference maneuvers: A rectangular pattern, where you pick out a rectangular field or other reference on the ground and practice flying along its boundaries, and turns around a point, where you pick an object on the ground and turn 360° around it, keeping your lateral distance from the object constant. These sound like simple exercises, but when you factor in the effect of wind on your flight path, they can become an exercise in frustration.

We preflighted the plane and I got us in the air (my takeoffs are becoming better, although I still have some room for improvement). My CFI directed me to a field he likes to use for the rectangular patterns and we started working on those first. I felt like I was behind the airplane the entire time. I’m still having trouble getting my sight pictures correct, so my CFI was constantly on me to correct my pitch attitude. Also, I didn’t have a good sense of how the wind would impact my turns — when the wind is blowing the plane, you have to crab the plane into the wind a bit if you want to maintain a straight track over the ground. You also need to alter how steeply you bank your turns, depending on which direction the wind is coming from relative to your turn. I wasn’t doing a great job of this so my rectangular pattern was a bit misshapen!

The purpose of teaching the rectangular pattern is to get you used to the concept of the airport traffic pattern, where you need to fly a rectangle around the runway you want to land on. It is really important to be able to fly the pattern accurately, since getting it wrong in the traffic pattern can disrupt the traffic flow of the airport and potentially put you in a collision path with another aircraft. I’ll definitely need to work on this some more.

Ground reference maneuvers - rectangular pattern
Rectangular patterns

We then flew to another area and did some turns around a point. Again, the wind caused me some trouble and I also had a bit of difficulty picking out good references on the ground to help keep me on track. Something else I struggled with was keeping my altitude constant while doing my turns, which is a requirement to pass the checkride. I wasn’t doing too badly, but I was starting to get a little frustrated.

Ground reference maneuvers - turns around a point
Turns around a point

We finished up and I headed back to DXR where my CFI got us back on the ground. I left the airport feeling a bit down on myself and thinking I might never get the hang of this. After some reflection, however, I remembered that this was the first time I was doing any flight while trying to keep reference to the ground and this would all feel like second nature by the time I was ready for my checkride. I compared it to driving a car — how I could effortlessly keep the car centered in my lane and knew exactly how much to accelerate or brake during turns to keep the car where I wanted. This didn’t happen after my first driving lesson, but gradually as I gained more experience.

Frustration aside, it was a fun lesson. It was the first lesson where I really got to focus on the view of the ground from the plane, and it reminded me of how lucky I am to be able to pursue this dream and why I love flying in the first place.

Flight time today: 1.2 hours
Total flight time to date: 9.1 hours
Total takeoffs to date: 3

Ground School – Airspace and sectional charts

Today the weather did not cooperate, so it was off to the classroom for a lesson on airspace. I really enjoyed this lesson because we actually broke out the sectional chart and studied the airspace around Danbury. This was the first lesson that touched on topics used when actually taking the plane someplace, as opposed to the early lessons which were focused on flight theory and how to properly control the aircraft during maneuvers. There was something very exciting about this and it felt like I had reached another milestone (albeit a small one) in my training.

The airspace in the US is incredibly complex, and looking at a sectional chart is overwhelming at first. There is a ton of information packed into these charts! Here’s a small portion of the New York Sectional showing my home airport of DXR (click for a larger version):

NY Sectional chart

Understanding airspace is really important around Danbury, as we have a lot of heavy-duty airspace very close to our airport. We’re a stone’s throw from the massive NYC Class Bravo, and the entire NY metro area can get very busy at times. That is one reason it will take me a while before I am signed off to solo — my instructor has to be sure I won’t accidentally find myself flying over JFK or into the flight path of an arriving 747!

I purchased my own copy of the NY sectional chart and will start studying it at home. Another great resource is SkyVector, a flight planning website which has stitched together all of the US sectional charts, allowing you to scroll around and explore any airspace in the entire country without needing to purchase a whole suite of charts.

Steep turns

Today started with a quick ground school lesson on steep turns. For the PPL, a steep turn is defined as a 45° angle of bank. You have to be able to demonstrate steep turns without losing or gaining excessive altitude to pass the PPL checkride.

We went up in the plane and practiced some of these. I think I did pretty well — especially considering it is a much different sight picture than I am used to. I did lose altitude on a few of them, but towards the end of the lesson I felt like I was getting the hang of them.

One interesting thing about steep turns — the G-forces you feel are pretty intense. You really feel yourself being pushed into your seat and you can get bit lightheaded performing them.

Effects of G forces
Source: xkcd.com

My CFI demonstrated a 60° angle of bank turn to show me what those G-forces felt like. It reminded me a bit of a roller coaster — definitely something to be aware of as I progress through my training! As he performed the turn, I tried to lift my hand in the air — it was pretty difficult! I can only imagine being in a fast spin, disoriented, feeling several G’s of force pressing on you, and trying to execute the right control sequence to recover the airplane (assuming you stay conscious long enough). It’s obviously much better to avoid getting yourself into a situation like that in the first place!

In normal flight, you should never have to perform a 45° turn (much less a 60° turn), but I’ll need to perform these during my checkride. I’ll definitely need to practice them some more, but all in all I think I handled the plane fairly well today.

Flight time today: 1.1 hours
Total flight time to date: 7.9 hours
Total takeoffs to date: 2

Stalls, revisited (and first takeoff!)

Today we worked on more stalls.

After yesterday’s ground school lesson and the quick demo my CFI gave me during the last flight, it was time to do some real work with stalls.

We did power on and power off stalls, both with and without flaps extended. I learned to recognize the warning signs and how they actually expressed themselves during flight.

The warning signs are:

  • Buffeting — the feel of the controls starting to vibrate as the airfoil loses its lift
  • Control effectiveness — the controls become sloppy and mushy as lift deteriorates
  • Wrong attitude — the sight picture for phase of flight is wrong (for example, the nose is way too high for level flight)
  • Airspeed — the airspeed indicator shows you are flying too slowly
  • Kinesthetics — you feel the increased G-forces pushing you into your seat
  • Stall horn — the audible horn that sounds when the wing start losing lift

After forcing the plane into each stall, we worked on recoveries. This is something I’m going to need a lot more practice with — I want stall recognition and recovery to become second nature. This is a very serious area of instruction that can mean the difference between life and death.

I did reach a big milestone today: Performing my first unassisted takeoff! My inexperience showed — I was weaving around the centerline while accelerating down the runway and had trouble finding the right climb attitude after rotation. I also learned that it takes quite a bit of right rudder while taking off and climbing out to counteract the tendency of the plane to pull to the left (due to P-factor). I’m definitely going to need some more practice!

Flight time today: 1.2 hours
Total flight time to date: 6.8 hours
Total takeoffs to date: 1

Slow flight and the dreaded stall!

Today we practiced slow flight.

We started the day with a ground school lesson on how to check weather. My CFI showed me the awesome Aviation Weather Center, which has become one of my favorite bookmarks. After determining the weather wasn’t bad enough to prevent a lesson, I grabbed the keys to N1727V.

Out to the plane, preflight, taxi to the active runway (still feel like a drunk duck), and takeoff performed by my CFI. This time he had me do the takeoff while he assisted on the controls. Out to the practice area we go.

We worked on slow flight — this is where you fly the plane at slow speeds (duh!). It is designed to teach you how the plane feels at slower speeds — the controls are less effective and you need more control input to move the plane around where you want it. This is a precursor to landing, where your final approach is done at slow speeds.

My CFI then demonstrated a stall. At altitude, a stall is easily corrected by pitching down and gaining airspeed. Where stalls are killers is in low altitude, such as when coming in for a landing. If you get too slow or let the angle of attack get too high when low to the ground, you can stall and fall into the ground with Very. Bad. Results.

Luckily, recovery (given that you have sufficient altitude) is fairly simple — get the nose down and increase airspeed to decrease the angle of attack and get that airflow normalized over the wing.

After the stall and recovery demo, we headed back to land at DXR. Another lesson in the books!

Flight time today: 1.4 hours
Total flight time to date: 5.6 hours

Ground School – Stalls

The snow had stopped but the clouds and winds conspired to keep me on the ground today. We spent my lesson in the classroom going over stalls.

When a non-pilot thinks “stall” they think of something like a car stalling, where the engine stops. That is not what a pilot refers to when they talk about stalls. A stall in aviation is where the wing of the plane cannot generate enough lift to maintain flight — the angle of attack of the wing is too great to keep a smooth airflow over the surface of the wing. The disrupted airflow spoils the lift and the wing stalls, causing the plane to pitch down or to the side.

My instructor taught me about the warning signs pointing to an impending stall and how to recover from one. A stall can be a very serious event (one of the leading killers of pilots when it occurs at low altitude), so this was one somber lesson I really took to heart.

Snow day

I drove to the airport today even though there was a minor snowstorm overnight — I was a bit naïve and thought there was a chance we might go up today. No dice, my CFI didn’t even make it to the airport and I headed home after waiting there for about an hour (at least I was studying my textbook so it wasn’t entirely wasted time).

Mother Nature can’t be beat — a lesson best learned early in any pilot’s career.

Coordination exercises

Today there was no ground school — right out to the plane to preflight and takeoff. I did the radio calls again — I feel lucky here, as my experience simming has given me a lot of fake ATC experience. I have to give a shout-out to PilotEdge here. PilotEdge is a great subscription ATC service for flight simmers with ultra-realistic radio comms — definitely a great help preparing me for the real thing. I highly recommend them!

We got out to the practice area and worked on various turns and flight attitudes with the focus being on keeping the plane in coordinated flight. When you turn in a plane, the tail has a tendency to slip or skid in different directions than you are turning — that is why you have a rudder, to keep the tail of the plane aligned with your turn (a very simplified explanation, but all I have right now!) At best, an uncoordinated turn is inefficient and will cause poor maneuvering and poor flight & fuel efficiency. At worst, it is extremely dangerous and can cause the plane to enter a spin — a very bad situation!

We worked on a “box maneuver” — basically, drawing a box in the air with the nose of the plane. I raise the nose up to draw one side of the box, then use rudder, some opposite aileron, and elevator together to move the nose over to the right (or left) while keeping it level with the horizon (forming the top of the box). Next, I drop the nose to form the third side of the box, and then use rudder, some opposite aileron, and elevator together again in the other direction to close the box. Easier done than explained!

The purpose of these maneuvers is to teach the beginning concepts of a slip, where you use opposite aileron and rudder to keep the nose straight while losing altitude — this is a very useful maneuver when coming in for a landing where you need to lose altitude while keeping the plane on a stable approach path.

I worked on the boxes for a bit and then we headed back to DXR. My CFI did the landing again and I did the after-landing cleanup and taxi back to the ramp. This was my longest flight to date!

Flight time today: 1.5 hours
Total flight time to date: 4.2 hours